Materials I used were a black shadow box/magnet board, scrapbook paper, stickers, bottle caps, vinyl, mod podge, adhesive, score board, circle cutter, cricut, and paper trimmer. I had everything on hand which made for a cheap and fun craft!
I started with my 12x12 scrapbook paper as my base, and another sheet of coordinating 12x12 paper. I cut 7 1" circles from the coordinating paper, using my circle cutter. I then used adhesive and glued each one to the top off the bottle cap embellishment (found at local craft store).


Next I cut SMTWTFS on black vinyl with my cricut. I used the Art Philosophy cartridge from Close to my Heart (a favorite of mine). I cut the letters at 3/4' inch and placed one on each bottle cap. I adhered the bottle caps to the base paper.
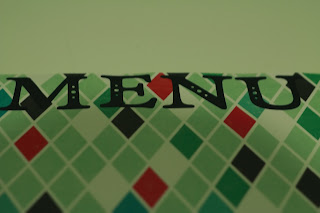
Next, I cut the word MENU with the same cartridge on my cricut. These letters I cut at 2" each, then placed them at the top of the base paper.

Then I used scraps form the coordinating paper to make the pockets. I cut them approximately 3"x3". I then used my scoreboard and scored lines on the sides and base of the paper at 1/4". I folded these over, added adhesive, and glued them on the right side of the base paper. (Glue was added on the three scored edges only, the top is open to create the pocket).
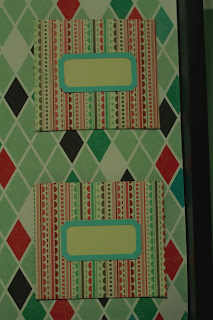


After that I cut out labels with my cricut using the same CTMH cartridge, 1" in height. Then I cute out the words main and side at 1/2 inch. I added adhesive to the letters and labels and placed them on the pockets.


Next, I cut out a number of 1"x3" strips of plain card stock (green, pink, and off-white). After I had all my strips cut, I added sticker letters to coordinate with meals and side dishes (will add more as I go along).

Last I added mod podge to help seal the letters on the bottle caps, base paper, labels, and strips of paper. I had epoxy magnets on hand to hold each meal in its place (plan to make more soon with coordinating paper). Now the menu board is complete and ready to hang!